Please note: All chemicals and experiments can entail an element of risk, and no experiments should be performed without proper adult supervision.
January, 2006
A Kid’s Lava Lamp
Kids, did you ever want to try to make your own lava lamp? While real lava lamps rely on materials and chemicals for a more advanced age group, you can get a similar effect with simple household ingredients. Here is what you need: vegetable oil or baby oil, water, food coloring, glitter or small beads, and a glass jar with a lid. First, fill the jar about a third full of oil. Next, sprinkle on glitter, sequins, small beads, or any tiny sparklies that catch your eye. Add water to nearly fill the jar and add a drop or so of food coloring. Finish filling the jar with water, then screw the lid on tightly. Flip the jar over. Flip it back. Shake it up. Have fun!
What's going on? The oil is less dense than water, so it wants to float on top. Water is a polar molecule, while oil is nonpolar. Polar molecules stick to each other, but not to nonpolar molecules. Even though oil and water are both liquids, they are what chemists call immiscible liquids. That's a fancy word that means they don't mix. When you add the food coloring, is it in the oil or the water? How can you tell? Is food coloring polar or nonpolar?
Try this variation. Let the liquids settle then open the jar and sprinkle a tiny bit of salt on top. What happens? Why? Salt is heavier than water, so when you pour salt on the oil, it sinks to the bottom of the mixture, carrying a blob of oil with it. In the water, the salt starts to dissolve. As it dissolves, the salt releases the oil, which floats back up to the top of the water.
How does a lava lamp work? Like your oil and water, the "lava" doesn't mix with the liquid that surrounds it. When it's cool, the lava is a little more dense than the liquid surrounding it. When the lava rests on the bottom, the light bulb in the lamp warms it up. As it warms up, the lava expands a little. When it expands, the lava stays the same weight but it takes up more space, which means that it is less dense. When it's warm enough, the lava rises up to the top to float. At the top of the lamp, it cools down, becomes more dense, and sinks once again. This cycle repeats over and over as the lava warms up and rises, then cools down and sinks.
A traditional lava lamp consists of a conical metal base with a 40-watt light bulb, and a teardrop-shaped glass container that fits snugly over the base and bulb. Inside this glass container is a combination of colored water or alcohol and a gooey substance consisting mostly of paraffin wax, carbon tetrachloride and mineral oil. There is also a little science lesson about emulsions and specific gravities in each lava lamp, but above all they offer us some fun!
-------------
Reference:
Dr. Anne Marie Helmenstine at http://chemistry.about.com/cs/howtos/ht/nontoxlavalamp.htm
and Michael Pollick at http://www.wisegeek.com/what-is-a-lava-lamp.htm.
Eric Muller at http://www.oozinggoo.com/howto.html gives the original patent as well as typical homemade mineral oil/alcohol versions.
February, 2006
A Borax Snowflake
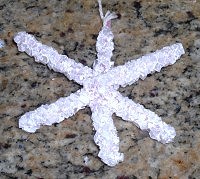 Kids, do real snowflakes melt a little too quickly for your full enjoyment? How about growing your own out of borax, coloring it blue if you like, and enjoying the sparkle all year long! Here is what you need: string, a wide-mouth pint-sized jar, white pipe cleaners, borax (see tips), a pencil, boiling water, optional blue food coloring, and scissors.
Here is what you do. 1. Cut a pipe cleaner into three equal parts. 2. Twist the sections together at their centers to form a six-sided snowflake shape. This will be your scaffold or template. If an end isn't even, just trim to get the desired shape. The snowflake scaffold should fit inside the jar. 3. Tie the string to the end of one of the snowflake arms. Tie the other end of the string to the pencil. You want the length to be such that the pencil hangs the snowflake scaffold freely into the jar (not touching the bottom of the jar). 4. Take the snowflake scaffold out of the jar and ask your adult partner to fill it with boiling water. 5. Add borax powder, one tablespoon at a time, to the boiling water. Stir to dissolve after each addition. Use 3 tablespoons of borax per cup of water (1 pint = 2 cups). It is okay if some undissolved borax settles to the bottom of the jar. 6. If desired, you may tint the mixture with food color. 7. Hang the pipe cleaner snowflake into the jar so that the pencil rests on top of the jar and the snowflake is completely covered with liquid. 8. Let the jar sit in an undisturbed location overnight. 9. The next day, look at your pretty crystals! Remove the snowflake, dispose of the liquid down the drain, and re-hang the snowflake until it is dry. Then you can hang your snowflake as a decoration or in a window to catch the sunlight.
What is the chemistry here? This can be considered as an example of geochemistry. Borax is a complex borate mineral of composition Na2B4O7 -10H2O (hydrated sodium borate). It is formed in deserts from the evaporation of water in temporary lakes called playas. The playas form only during rainy seasons due to runoff from nearby mountains. The runoff is rich in the element boron and is highly concentrated by evaporation in the arid climate. Eventually the concentration is so great that crystals of borax and other boron minerals form.
Tips:
1. Borax is available at grocery stores in the laundry soap section, (e.g. 20 Mule Team Borax Laundry Booster). Do not use Boraxo soap.
2. Because boiling water is used and because borax isn't intended for eating, adult supervision is recommended.
3. If you can't find borax you can use sugar or salt. In these cases the crystals will take longer to grow, so be patient. Add sugar or salt to the boiling water until it stops dissolving. Ideally you want no crystals at the bottom of the jar.
-------------
Reference:
Dr. Anne Marie Helmenstine at:
http://chemistry.about.com/cs/howtos/ht/boraxsnowflake.htm?nl=1
March, 2006
Metal Mania � Part I
 Kids, do you think you could make pennies change from dull to shiny to green right before your eyes? Over the course of two months, we’ll learn about metals using pennies, nails, and a few simple household ingredients to explore some of the properties of metals.
For this month you will need: 10-20 dull pennies, 1/4 cup white vinegar (dilute acetic acid, CH3COOH), 1 teaspoon salt (sodium chloride, NaCl), a shallow, clear glass or plastic bowl (not metal), water, plastic gloves, and paper towels.
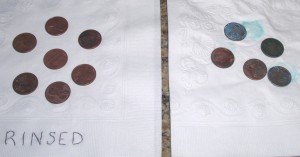
For “Shiny Clean Pennies”, pour the salt and vinegar into the bowl. Stir until the salt dissolves. Dip a penny halfway into the liquid and hold it there for 10-20 seconds. Remove the penny from the liquid. What do you see? Dump the rest of the pennies into the liquid. The cleaning action will be visible for several seconds. Leave the pennies in the liquid for 5 minutes.
After the 5 minutes, take half of the pennies out of the liquid and place them on a paper towel to dry. Remove the rest of the pennies and rinse them well under running water. Place these pennies on a second paper towel to dry. Write labels on your paper towels so you will know which towel has the rinsed pennies. Allow about an hour to pass and take a look at the pennies you have placed on the paper towels. Are they different?
Pennies get dull over time because the copper in the pennies slowly reacts with moist air to form hydrated copper carbonate (which is greenish). When you place the pennies in the salt and vinegar solution, the acid from the vinegar dissolves this “patina”, leaving behind shiny clean pennies. The copper from the patina stays dissolved in the liquid. You could use other acids instead of vinegar, like lemon juice. Rinsing the pennies with water stops the reaction between the salt/vinegar and the pennies. They will slowly turn dull again over time, but not quickly enough for you to watch.
On the other hand, the salt/vinegar residue on the unrinsed pennies starts another reaction between the copper and the oxygen in the air. Let the pennies dry overnight; the resulting blue-green copper substance is called “verdigris”, which is one of several copper acetates (e.g. Cu(CH3COO)2·CuO·6H2O). You may even see this stain on the towel. (Since most copper salts, including the carbonates and acetates here, are considered to be irritants, an adult partner should handle the verdigris pennies with gloves and dispose after use).
TRIVIA: Some copper carbonate minerals (CuCO3) in nature are malachite and azurite. Copper acetate (verdigris) is used as a dye, and it can form on copper pots that are used to cook acidic foods such as tomatoes.
Keep the liquid that was used to clean the pennies stored safely until next month. We will use it in Part II to make “Copper Plated Nails”.
-------------
Reference:
Dr. Anne Marie Helmenstine at:
http://chemistry.about.com/cs/demonstrations/a/aa022204a.htm and http://www.scorecard.org/chemical-profiles/html/coppercompounds.html
April, 2006
Metal Mania � Part II
 Kids, have you ever seen a copper-colored nail? In this month’s activity you will make one of your own. First you will need the solution left over from last month’s experiment (Metal Mania – Part I). If you didn’t save the solution or if it has degraded, have fun repeating that experiment now!
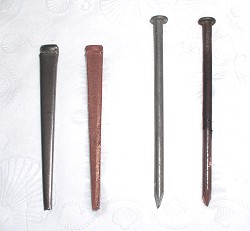
While you are waiting for the pennies to do their thing on the paper towels, use the salt and vinegar solution to make some “Copper Plated Nails”. Place one clean ungalvanized iron screw or nail so that it is half in and half out of the solution you used to clean the pennies. If you have a second nail or screw, let it sit out on a counter for comparison (your “control experiment”). We also placed a masonry nail entirely in the solution. Do you see bubbles rising from the nail or the threads of the screw? Allow 10 minutes to pass and then take another look. Does the metal have two different colors? If not, return the nail or screw to its position and check it again after an hour.
Eventually, the copper in the solution from the pennies will coat the nail or screw. How does that happen? Copper exists in the salt/vinegar solution as positively charged copper ions. The reaction between iron metal and copper(II) ions is called an oxidation-reduction reaction. Iron is more active than copper in this reaction, which means it loses electrons more easily than Cu. In other words, copper(II) will take iron’s electrons, causing it to plate out as metal (it is “reduced”) on the iron nail (which gets “oxidized”). At the same time, the reactions involving the hydrogen ions from the acid and the metal produce some hydrogen gas, which bubbles up from the site of the reaction - the surface of the nail or screw. When you take the nail out of the solution, the copper will be somewhat sticky; you can set it on a paper towel to dry. Your nail might not be entirely coated, but it will have enough copper on it to see.
You might try this experiment again using only pennies made before 1982. These contain 95% copper as opposed to only 2.5% Cu in pennies since then. Did the nail get a copper coating more quickly or in the same amount of time? Was it a more complete coating? What happens if you use a stainless steel nail? Come to think of it, what exactly is “stainless” steel? First, steel is iron with some carbon added to make it harder and stronger. Adding a minimum of 12% chromium to the steel makes it resist rust, or stain 'less' than other types of steel. The chromium combines with oxygen in the atmosphere to form a thin, invisible layer of chrome-containing oxide, making a passive film. So, what does that tell you to expect from a copper plating experiment using a stainless steel nail?
NOTE: The accompanying photo on the website version of this article shows two types of iron nails and their controls; one was placed entirely in the solution and the other was in 1/3 of the way.
-------------
Reference:
Dr. Anne Marie Helmenstine at:
http://chemistry.about.com/cs/demonstrations/a/aa022204a.htm and
http://www.hometrainingtools.com/articles/metals-iron-conductivity-science-projects.html
May, 2006
Fudge Factor
Kids, what is it about the texture (the “mouth feel”) of fudge that just makes it taste so good? Did you know that this texture can be defined by crystals? Little teensy sugar crystals that are completely surrounded by a very concentrated sugar syrup. So, in making your own fudge, you are actually doing your own science experiment in making crystals.
As a demonstration, you’ll need a heavy-duty 2-quart saucepan, a wooden spoon, 2 cups sugar and 2 cups H2O. Combine and have an adult partner bring to a boil on a stove. You’re also going to need a really good thermometer (best is a digital candy thermometer). When all of the sugar crystals dissolve, a syrup is created. On a molecular level, the solution's not too hot, so they're moving around slowly and the molecules are more attracted to the surrounding water than they are each other. Put on the lid for three minutes. The trapped steam will condense on the lid, roll down the sides, and dissolve any sugar crystals that might be stuck there, waiting to set off a chain reaction of crystallization. Take off the lid and put in the thermometer. As the solution boils it becomes more concentrated because the water can escape as steam but the sugar can't. As a result, the temperature of the solution begins to rise beyond 212 oF. So not only are the sugar molecules moving around a lot faster now, they don't have near as much room to move in. In other words, this solution is concentrating. Now, by watching the temperature, you can gauge when the concentration is right for forming the crystals. This controls the candy of your choice.
An adult partner can try this with a wooden spoon. When a small dollop of syrup is dropped into cold water, it behaves in a very specific way that depends on the sugar concentration. From 230-234 oF, it forms soft threads. 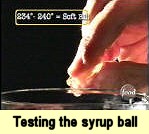 Between 234-240 oF, it forms a soft ball, which is just right for fudge or pralines. Between 244-250 oF, you get a firm ball, good for caramels. From 250-266 oF, you get a hard ball (great for nougat). Taffy makers wait for 270-290 oF when hard but pliable threads form in the water. Threads also form between 300-310 oF, but these are very brittle but perfect for hard candies, brittles and lollipops. The website version of this article shows pictures of all these stages. Let the syrup cool completely and dispose. The reference below has a true fudge recipe; the trick is to keep the crystals small enough by proper temperature and vigorous stirring. Big crystals make grainy fudge. Yuk.
Can you make decent fudge in a microwave? No. But you can make a nice fudge-like candy and it’s a whole lot safer. Cut up 2 sticks of unsalted butter and add a cup of peanut butter in a microwave-safe bowl. Stir till smooth. Cover with plastic wrap, poke a couple of holes for steam, and microwave on high for 2 minutes. Since we're not making a syrup, the large amount of fat here will make a liquid thick enough for the crystals to suspend in. Carefully remove the plastic wrap just enough to get a wooden spoon in. Give it a good stir, re-cover, and microwave for another 2 minutes of cooking on high. It’s really hot now so use oven mitts. Add 1 tsp vanilla and 16 oz powdered sugar. Stir until the luster is gone (it gets so thick that a potato masher works best). Scoop into a well-greased 8” x 8” glass baking dish and put in the refrigerator.
-------------
Reference:
Alton Brown of TV Food Network’s “Good Eats” at
http://www.goodeatsfanpage.com/Season7/Fudge/fudgefactor.htm
June, 2006
Pepper Tension
Kids, can you make pepper flakes, paper clips, and needles “walk on water”? Indeed you can, and here are the things you will need to make it happen: a bar of soap or liquid detergent, water, three shallow bowls or dishes, pepper flakes or talcum powder, a small string, paper clip, fork, needle, and a small plastic berry basket.
 Sprinkle pepper or talcum powder on the surface of cold clean water in a shallow dish. Allow the particles to spread out and cover the surface. Touch a bar of soap or put a drop of liquid detergent on the water's edge at the side of the dish. Observe what happens to the particles on the water surface. What did the pepper flakes do when you added the drop of soap? Did they (a) clump into a ball, (b) sink to the bottom, or (c) spread out toward the rim of the dish? You should see (c) happen, where the pepper spreads out toward the rim of the dish.
What’s happening here? The water molecules on the surface are strongly attracted to each other and pull each other in all directions at once. This creates a strong but flexible "skin" on the water's surface that is called surface tension. As the soap or detergent dissolves, it breaks the surface tension of the water in the area of the soap. Surface tension results from the tight bonds between the water molecules. When these bonds are disrupted by the soap, the surface tension is broken. The pepper flakes act as a visual indicator of this process as it is happening, as they “walk on water” towards the rim of the dish.
In the second shallow dish, float a small loop of string in the middle of the surface of water. Touch a bar of soap or put a drop of liquid detergent inside the loop. Observe what happens to the loop of string. The surface tension inside the loop of string should weaken by the soap but the surface tension outside the string should have pulled the string outward.
In the third shallow dish, lower a paper clip and a needle flat onto the water surface using the fork. In this same dish, carefully set the berry basket on the surface of the water. All three of these items should float on the water surface. Touch a bar of soap or put a drop of liquid detergent to the water surface. Observe what happens to the floating items. The paper clip, needle and even the plastic basket should have floated on top of the water due to the water's surface tension. As soon as the tension was broken by the soap, these items should have sunk to the bottom.
What else besides soap do you think could break the surface tension? Try different things! NOTE: the website version of this article will show a figure of the pepper experiment.
-------------
Reference:
http://education.usace.army.mil/clubhouse/science/experiment.cfm?Topic=surften&Id=126
September, 2006
A Silver Tarnish Dip
Kids, how would you like to make your own silver polishing dip? Ask your adult partner if they happen to have some older silverware, trays, servingware, jewelry etc. around the house. Is it nice and shiny or is it dull and dark? As silver (element Ag) is exposed to the small amounts of hydrogen sulfide (H2S) in the air it will “tarnish”. This layer of tarnish is silver sulfide (Ag2S) that can be removed without polishing and scrubbing by simply dipping into a non-toxic electrochemical dip. Another big advantage to using a dip is that the liquid can reach places a polishing cloth cannot.
First, line the bottom of the sink or a glass baking dish with a sheet of aluminum foil. Then have your adult partner fill the foil-lined container with steaming hot water. Add salt (sodium chloride, NaCl) and baking soda (sodium bicarbonate, Na2CO3) to the water. Some recipes call for 2 tsp baking soda and 1 tsp salt, whereas others call for 2 tablespoons each of baking soda and salt. Obviously the exact amounts do not matter, so just add a bit of each. Drop the silver items into the container so that they are touching each other and resting on the foil. You should actually be able to watch the tarnish disappear!
Leave heavily tarnished items in the solution for as long as 5 minutes. Otherwise, remove the silver when it appears clean. Rinse the silver with water and gently buff it dry with a soft towel. Ideally, the silver should be stored in a low-humidity environment. Placing a container of activated charcoal or a piece of chalk in the storage area (to soak up moisture) can minimize future tarnish. Also, wrapping the silver items to protect from air seems to help.
Silver Tips:
1. Use care when polishing or dipping silver plated items. It is easy to wear away the thin layer of silver and cause more harm than good through overcleaning.
2. Minimize exposing your silver to foods and other items that contain sulfur such as mayonnaise, eggs, mustard, onions, latex, and wool because the sulfur will cause corrosion.
3. Using your silver flatware or wearing silver jewelry will actually help to keep them free from tarnish.
-------------
Reference:
Anne Marie Helmenstine at http://chemistry.about.com/cs/howtos/ht/silverdip.htm
October, 2006
Some Like it Hot — Some Like it Cold
Kids, would you believe that when something rusts, heat is produced? Or that when some compounds are mixed the temperature can go down? A chemical reaction that produces heat is called “exothermic” and one that needs heat, where the temperature decreases, is “endothermic”.
In our test exothermic reaction, vinegar is used to remove the protective coating from steel wool, allowing it to rust. When the iron combines with oxygen, heat is released. For supplies you will need a thermometer, a clear jar with a lid, steel wool and vinegar. First, put the thermometer in the jar and close the lid. Wait about 5 minutes, remove the thermometer and record the temperature. Now soak a piece of steel wool in vinegar for 1 minute. Squeeze the excess vinegar out of the steel wool. Wrap the wool around the thermometer bulb and place the wool/thermometer in the jar, sealing the lid. Wait for another 5 minutes, then read the temperature and compare it with the first reading. What happened?
In the rusting of iron, four atoms of solid iron react with three molecules of oxygen gas (O2) to form two molecules of solid rust (iron oxide, Fe2O3). The reaction looks like this:
4 Fe + 3 O2 —> 2 Fe2O3
Rust is the common name for a very common compound, iron oxide. Iron combines quickly with oxygen, so quickly that pure iron is rarely found in nature. Iron (or steel) rusting is an example of corrosion, which is an electrochemical process. Did you know that liquids like acid rain (and our vinegar), seawater and the salt-loaded spray from snowy roads make them better electrolytes than pure water, allowing their presence to speed the process of rusting on iron objects?
An endothermic reaction requires energy to proceed, which may be observed as a decrease in temperature during reaction. Once the reaction is complete, the temperature will return to normal. For our “endothermic” reaction example you will need: 25 ml citric acid solution (dissolved in water), 15 grams baking soda, a Styrofoam cup, thermometer, and something to stir with. First, pour the citric acid solution into the cup. Record the initial temperature. Stir in the baking soda (sodium bicarbonate, NaHCO3). Track the change in temperature as a function of time. The reaction is:
H3C6H5O7 + 3 NaHCO3 —> 3 CO2 + 3 H2O + NaC6H5O7 (sodium citrate)
When done, simply wash the cup out in a sink. The exact amounts of citric acid in water and baking soda are not critical, and you can vary them to test this.
-------------
Reference:
Dr. Anne Marie Helmenstine at http://chemistry.about.com/cs/howtos/ht/exothermic.htm and http://chemistry.about.com/cs/howtos/ht/endothermic.htm . Most large grocery/drug stores sell citric acid in capsule or tablet form; also, this link offers some commercial chemicals in small quantities at reasonable prices: www.chemistrystore.com/citric_acid.htm .
Updated 8/4/06